Cart (0)
Subtotal
0,00 €
De: Contributor Grow
The germination of vegetable seeds is the process of growing plants directly from seeds rather than growing them from cuttings or buying plants that have already been grown. Although this may seem like a simple process, following some good practices is essential for success. This is why we’ve prepared this step-by-step guide to help you achieve this.
Sowing seeds indoors is a common technique among those who have orchards or gardens in their backyard, or who simply want to plant in a pot on their balcony. This is also a popular method for those who live in more northern areas, where young seedlings may have difficulty surviving in cold conditions. Germinating seeds indoors is an effective way of increasing the germination rate as compared to when this is done outdoors, directly in the soil.
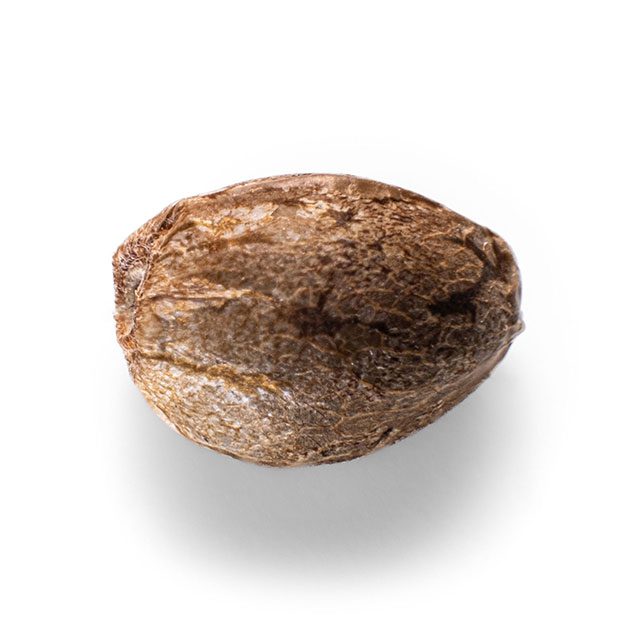
If properly preserved, seeds can remain in perfect condition for months or even years. This is because their shell keeps them protected and in a dormant state until the right conditions arise for germination to start.
To store the seeds properly, humidity levels should be kept between 10 and 20%. Lower levels than this could lead to them becoming totally dehydrated, whereas higher levels could trigger the germination process sooner than desired. It is also vital that they aren’t exposed to either excessively high temperatures or sudden thermal changes. To prevent this, many growers choose to store them in the fridge.
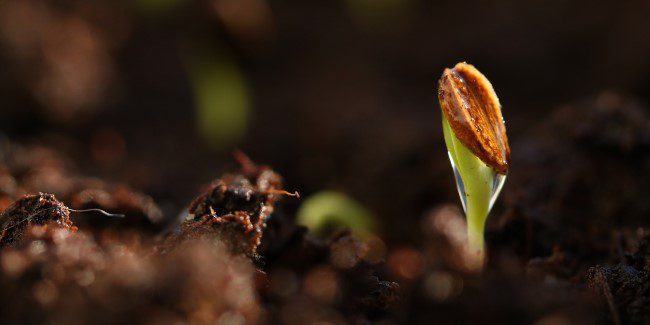
Under the right conditions, the seeds start to hydrate and activate their metabolism until they swell and open. Once this happens, the radicle appears, which is the part of the plant’s embryo that develops to become the main root. Afterwards, the plumule is pushed up towards the surface to become the stem and leaves.
Regardless of the method used, it is important to follow some basic guidelines to successfully germinate the seeds. Remember that this is the first stage of life of your plants, which is when they are most delicate and vulnerable:
There are certain devices called seed germinators or greenhouses, of various sizes and characteristics, which are specifically designed for optimal seed germination. Having a water sprayer available is also useful, if not indispensable.
There are several ways to germinate seeds, and each grower chooses the one that best suits their preferences. Here we explain how to follow some of the most popular ones:
Although this method is quite popular, it is not the most effective:
This is probably the most frequently used method, as it ensures a good germination rate. For this, you need some paper napkins or kitchen paper, which are great for maintaining high humidity levels.
The greatest advantage of this technique is its high success rate, although it is crucial to keep the napkins damp at all times, preventing them from either drying up or becoming too soaked.
Jiffy pellets made of peat and/or coco coir, as well as certain rockwool compounds, can greatly facilitate the seed germination process as they help maintain good humidity levels and have a compact structure that is ideal for the initial development of the roots. Germinating seeds in these materials is really simple:
If done correctly in a suitable, healthy substrate, this technique is highly effective. Growers who choose this option normally do it in small pots, by previously dampening the growing medium (either soil or coco coir) and by placing the seeds in small, 1-1.5 cm deep holes before covering them. You can also soak the seeds in warm water for 12 to 24 hours before planting them.
The main benefit of this method is that you don’t need to move or manipulate the seeds, which in turn reduces the risk of any stress factors (as long as the seeds are not buried too deeply). Besides, germinating directly in the substrate helps keep temperature and humidity stable.
Regardless of the technique that you use for the first few phases of germination, it is vital to keep the lighting, temperature, and humidity parameters under control once the seed is in the pot with the substrate. As has already been mentioned, your plants are like ‘little babies’ at this stage, and excessive irrigation, for instance, could lead to the appearance of fungi and the subsequent withering of the first roots.
Now that you’ve learned about the different germination techniques and which mistakes you must avoid with each of them, you’re ready to start your own experience. We wish you a great start!
Kannabia Seeds Company sells to its customers a product collection, a souvenir. We cannot and we shall not give growing advice since our product is not intended for this purpose.
Kannabia accept no responsibility for any illegal use made by third parties of information published. The cultivation of cannabis for personal consumption is an activity subject to legal restrictions that vary from state to state. We recommend consultation of the legislation in force in your country of residence to avoid participation in any illegal activity.

El 29 y 30 de noviembre se celebraron las jornadas “Cannabis desde un enfoque integral”. Expertos cannábicos se reunieron en la Universitat de Valencia con el objetivo de informar y ...
In the world of cannabis, each strain is a growing experience worth trying out. Today, we invite you to go on a different adventure: the grow report of the strain


A Kannabia Seed Company vende sementes de hobby (coleção) para uso pessoal para seus clientes. É proibida a sua germinação e cultivo. O comprador compromete-se a consultar a legislação em vigor no seu país de residência para evitar incorrer na prática de uma atividade ilegal.
Iberian Peninsula express shipping
0€ Orders over 60€
*6€ orders under 59€
East, West, South Europe express shipping
0€ Orders over 150€
*18€ orders under 149€
North Europe express shipping
0€ Orders over 160€
*20€ orders under 159€
Ireland, Norway, UK normal shipping
0€ Orders over 60€
*6€ orders under 59€
Rest of the world normal shipping
0€ Orders over 180€
*25€ orders under 179€
Shipping costs can be confirmed in your shopping cart.
For additional shipping methods, please reach out through info@kannabia.com.


*Your coupon will be sent via email.

*Should you have any question, comment or feedback, please do not hesitate to contact us.